Showing posts with label healthy cooking. Show all posts

Sunday, October 7, 2012

The Anti-Chicken Fingers Movement ~ Quick Skillet Steak w/Onions & Mushrooms

This meal was great.  I've been trying to make new things each week, and my husband absolutely enjoys steak more than any other meat.  The kids love mushrooms, so it was a win-win!

Ingredients:

  • 1/2 lb thin cut beef round sandwich steaks
  • 1/2 large onion, sliced into rings
  • 1/2 tsp olive oil
  • 8 oz sliced mushrooms
  • 4 seconds cooking spray
  • garlic powder to taste
  • salt and fresh cracked pepper to taste
  • Cooked whole grain rice as side, or desired side dish

Directions:

Slice beef into thin strips. Season with salt, garlic powder and fresh pepper to taste. Heat a large skillet over high heat. When the skillet is very hot, spray with cooking spray and add half of the beef. Cook one minute, then turn steak and cook an additional 30 seconds. Set aside in a large dish.
Spray the skillet again and when it gets hot add the remaining steak, cooking one minute, then turning and cooking 30 seconds more. Add remaining steak to the dish. Return skillet to heat and spray once again with cooking spray; add onions and season with salt and pepper. Cook one minute, then turn and cook onions an additional 30 seconds or until onions are golden.
Lower heat to medium and add 1/2 tsp olive oil to the skillet, add mushrooms, salt and pepper and lightly spray the top of the mushrooms with cooking spray. Cook 1 1/2 minutes, then turn mushrooms and cook another minute and a half. Add to dish with steak and onions and stir to combine. Serve over brown rice.  ~Happy Eating Friends! Trina

Sunday, September 30, 2012

The Anti-Chicken Fingers Movement~Columbian Steak with Onions & Tomatoes

The appropriate name for this with a sunnyside egg on top is Bistec a Caballo.  I hesitated to put an egg on my husbands, because, it's different.  Shannon doesn't like different usually.  But when I asked him, he surprised me and wanted to try it.  It was delicious!  Serve by itself for a lower carb option, or with whole grain rice for a healthier option, or with mashed potatoes like we did.  Yummy! (Even the kiddos loved the egg! I cooked theirs thoroughly though!)

Ingredients:
  • 1-1/2 sirloin tip steak, sliced very thin
  • salt to taste
  • garlic powder to taste
  • cumin to taste
  • 4 tsp olive oil
  • 1 medium onion, sliced thin or chopped
  • 1 very large tomato or 2 medium tomatoes, sliced thin or chopped
  • 4 Eggs (or number of people you are serving)
  • Side of your choice, pototoes or rice

  • Directions:
    Season steak with salt and garlic powder. Heat a large frying pan until VERY HOT. Add 2 tsp of oil then half of the steak and cook less than a minute on each side. Set steak aside, add another teaspoon of oil and cook remaining steak. Set aside.

    Reduce heat to medium, add another teaspoon of oil and add the onions.  Cook a minutes, then add the tomatoes. Season with salt, pepper and cumin and reduce heat to medium-low.

    Add about 1/4 cup of water and simmer a few minutes to create a sauce, add more water if needed and taste adjust seasoning as needed. Return the steak to the pan along with the drippings, combine well and remove from heat.  Serve w/cooked sunnyside egg on top and your side of choice. 

    Happy Eating Friends! ~Trina


    Sunday, September 23, 2012

    The Anti-Chicken Fingers Movement ~ Turkey & Black Bean Enchiladas

    I just plain love cooking.  But, I truly enjoy trying new recipes.  There's something about cooking something you've never made and it turning out amazing.  Plus, I love cooking healthy dishes, so when I get a combination of delicious and healthy...I'm stoked! Shannon went hunting for an entire week, so I made a meal plan of all mexican and pasta dishes (he likes both, but, if you've followed my posts, you know he prefers meat and potatoes!).  I have one suggestion.  I choose to use wheat tortillas because they are healthier.  But, in enchiladas, white tortillas usually cook better.  These were good, but don't feel bad about substituting white if your hubby prefers it.  

    Ingredients:
    • 1 lb extra lean ground turkey
    • 15.5 can black beans, drained
    • 4.5 oz can chopped green chiles
    • 14.5 oz can diced tomatoes
    • 2 cloves garlic
    • 1/4 cup chopped onion
    • 1/4 cup chopped cilantro
    • 1-2 tsp cumin
    • 1/8 tsp chili powder
    • salt
    • 8 (6-inch) low carb whole wheat flour tortillas 
    • 1 cup reduced or non-fat shredded Mexican cheese (I used Fat Free and it was great)
    • nonstick cooking spray
    For the Enchilada Sauce:
    • 2 garlic cloves, minced
    • 1 7.76 oz can of green mexican salsa verde 
    • 1-1/2 cups tomato sauce
    • 1/2 tsp chipotle chili powder
    • 1/2 tsp ground cumin
    • 3/4 cup fat free chicken broth
    • kosher salt and fresh pepper to taste

    Directions:

    In a medium saucepan, spray cooking spray and sauté garlic. Add salsa verde, chili powder, cumin, chicken broth, tomato sauce, salt and pepper. Bring to a boil. Reduce the heat to low and simmer for 5-10 minutes. Set aside until ready to use.

    In a large skillet brown the turkey and season with salt. When the turkey is browned,add onion, garlic, black beans, cilantro, green chiles, diced tomatoes, cumin and chili powder. Mix well and simmer on low, covered for 20 minutes. Remove lid and simmer an additional 5-10 minutes to reduce the liquid.

    Preheat oven to 400 degrees. Spray a 13 by 9-inch glass baking dish with non-stick spray. Put 1/2 cup turkey mixture into each tortilla and roll it. Place on baking dish seam side down. Top with enchilada sauce and cheese. Cover with aluminum foil and bake in the oven on the middle rack for 20-25 minutes. Top with low fat sour cream, cilantro or scallions if you wish. Makes 8 small enchiladas.

    Happy Eating Friends! ~Trina

    Sunday, September 16, 2012

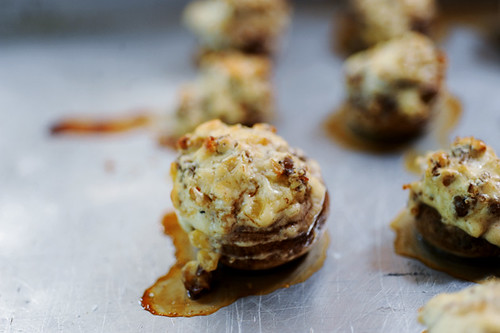
    The Anti-Chicken Fingers Movement ~Spicy Stuffed Mushrooms

    Stuffed MushroomsI made these last night for a party, and they are yummo!  I've made them a couple times, and they never fail me!  The kids usually take out the stuffing because it's too spicy, but it's a great appetizer for a party!!  I usually double the recipe for larger groups and have extra filling so be sure and load the mushrooms up!


    Ingredients

    • 12 whole fresh mushrooms
    • 1 tablespoon vegetable oil
    • 1 tablespoon minced garlic
    • 1 (8 ounce) package cream cheese, softened (use reduced fat if desired, but NOT FAT FREE!)
    • 1/4 cup grated Parmesan cheese
    • 1/4 teaspoon ground black pepper
    • 1/4 teaspoon onion powder
    • 1/4 teaspoon ground cayenne pepper (Use 1/8 if you don't like too spicy. These are spicy!)

    Directions

    1. Preheat oven to 350 degrees F (175 degrees C). Spray a baking sheet with cooking spray. Clean mushrooms with a damp paper towel. Carefully break off stems. Chop stems extremely fine, discarding tough end of stems.
    2. Heat oil in a large skillet over medium heat. Add garlic and chopped mushroom stems to the skillet. Fry until any moisture has disappeared, taking care not to burn garlic. Set aside to cool.
    3. When garlic and mushroom mixture is no longer hot, stir in cream cheese, Parmesan cheese, black pepper, onion powder and cayenne pepper. Mixture should be very thick. Using a little spoon, fill each mushroom cap with a generous amount of stuffing. Arrange the mushroom caps on prepared cookie sheet.
    4. Bake for 20 minutes in the preheated oven, or until the mushrooms are piping hot and liquid starts to form under caps.

    Happy Eating Friends! ~Trina

    Sunday, September 9, 2012

    The Anti-Chicken Fingers Movement ~ Cauliflower Crust Pizza

    I know what you're thinking!  I thought the same thing.  Disgusting.  However, the comments/reviews showed that it was actually quite yummy, and I figured...I'm always up for trying a new pizza recipe, esp one that's lower in carbs and fat than the regular recipe.  A veggie too?  Well heck, you could even call it healthy.  I warned Shannon: this is not pizza.  This is a cauliflower dish.  That way, he wouldn't be mad when it didn't taste like pizza.  Amazingly enough - after his first bite, his response was surprise.  He had three helpings, and asked for me to make it again the next day.  He even said he thought he liked it better than regular pizza crust.  That's what I call a successful meal!


    ingredients:

    • 1 cup cooked, smashed/riced cauliflower
    • 1 cup shredded mozzarella cheese (for crust)
    • 1 egg, beaten
    • 1 tsp dried oregano
    • 1/2 tsp crushed garlic
    • 1/2 tsp garlic salt
    • pizza sauce
    • olive oil (optional)
    • 1/2 pd lean ground beef (or your choice of meat topping) cooked
    • Tomato sliced
    • Light mix Italian or Cheddar Cheese

    directions:

    To "Rice" the Cauliflower:
    Take 1 large head of fresh cauliflower, remove stems and leaves, and chop the florets into chunks. Steam until soft, then mash with potato masher until pieces are tiny, nearly the size of grain rice.  It doesn't matter if you have a few larger chunks.
    One large head should produce approximately 3 cups of riced cauliflower. The remainder can be used to make additional pizza crusts immediately, or can be stored in the refrigerator for up to one week.
    To Make the Pizza Crust:
    Preheat oven to 450 degrees. Spray a cookie sheet with non-stick cooking spray.
    In a medium bowl, stir together 1 cup cauliflower, egg and mozzarella. Add oregano, crushed garlic and garlic salt, stir. Transfer to the cookie sheet, and using your hands, pat out into a 9" round. Optional: Brush olive oil over top of mixture to help with browning.
    Bake at 450 degrees for 15 minutes.
    Remove from oven. To the crust, add sauce, toppings (mine was cooked lean ground beef and a tomato) and cheese. Place under a broiler at high heat just until cheese is melted (approximately 3-4 minutes).
    *reminder that toppings need to be precooked since you are only broiling for a few minutes.
    Happy Eating Friends!~Trina


    Sunday, August 19, 2012

    The Anti-Chicken Fingers Movement ~ Stir Fry in a Tortilla

    This was the perfect meal for a Friday night.  Cheap, easy...and quick.  As you know, I'm very into health-friendly foods.  I like to find amazing recipes that are lower in bad fats and high in protein and healthy carbs.  Anytime you can sneak in a ton of veggies into a great meal, it's going to be a winner all the way around.  This will be one I make again, for sure! Enjoy!


    Ingredients:

    • 1 Tbl olive oil
    • 1 red bell pepper sliced
    • 1 yellow or orange bell pepper sliced
    • 1 box 0 oz mushrooms
    • 1/2 cup sliced red onion 
    • 1 lb of boneless, skinless chicken breast, cooked and cut up into bite-sized peices
    • 1 tsp chili powder
    • 1/2 tsp ground cumin
    • salt & pepper
    • 8 whole wheat tortillas
    • 1/4 cup whipped light or fat free cream cheese
    • 1/2 cup shredded reduced fat cheddar cheese or cheese of your choice
    Instructions:
    Warm oil in large, nonstick skillet.  Add the bell peppers, mushrooms, and red onion and cook, stirring frequently for five minutes or until tender. Reduce heat to medium and cover, cooking five minutes longer.
    Add chicken, chili powder, cumin, and salt and pepper to taste, tossing to mix well.  Cook and stir until heated through well.
    Meanwhile, warm tortillas in oven.  Spread each tortilla with cream cheese, then top with chicken & veggie mixture, then with cheese.  Roll up tortillas, and enjoy. 

    We just ate these alone, no sides.  Like I said, easy for a Friday night!  Happy Eating Friends! ~Trina


    Sunday, August 12, 2012

    The Anti-Chicken Fingers Movement ~ Grilled Flank Steak with Tomatoes, Red Onion & Basalmic

    Now, after my grilled flank steak fajitas last week, I decided I love flank steak.  Yes, it's a little pricey.  But, it's well worth the money because it's amazing and it's pretty large; they normally come in a 2lb package.  This steak was delicious!  


    • 2 lb flank steak, fat trimmed
    • kosher salt and fresh pepper
    • garlic powder
    • 1 tbsp extra virgin olive oil
    • 2 tbsp balsamic
    • 1/3 cup red onion, chopped
    • 3-4 tomatoes, chopped (about 3 1/2 cups)
    • 1 tbsp fresh herbs such as oregano, basil or parsley
    • Veggies or side dish desired, I used zucchini, yellow pepper & squash

    Pierce steak all over with a fork. Season generously with salt, pepper and garlic powder and set aside about 10 minutes at room temperature.
    In a large bowl, combine onions, olive oil, balsamic, salt and pepper. Let onions sit a few minutes with the salt and balsamic to mellow a bit. Combine with tomatoes and fresh herbs and adjust seasoning if needed.


    Heat grill or broiler on high heat. Cook steak about 7 minutes on each side for medium rare or longer to taste. Remove from grill and let it rest on a plate for about 5 minutes before slicing. 

    Slice steak think on the diagonal; top with tomatoes and serve with your choice of grilled veggies or potatoes.


    Happy Eating Friends! ~Trina

    Sunday, July 29, 2012

    The Anti-Chicken Fingers Movement ~ Buffalo Turkey Burgers with Blue Cheese Slaw

    I absolutely love anything with Buffalo sauce.  I love spicy and so finding this recipe and Frank's Hot Sauce was a dream come true.  You think I'm kidding, but I'm not!  I now use Frank's on everything from salads on my meat, mixed in with my homemade ranch salad dressing, on all my burgers, and even sandwiches.  It's awesome!  Also, I'm not a huge fan of Blue Cheese dressing, but this homemade version in the slaw was amazing.  The burgers were great because they had veggies mixed in, and (I left hot sauce & slaw off of the kids') because they were so good, the kids couldn't even tell.  Clayton ate a whole burger, including the bun, which is a first in our house. I served them with grilled potato slices.  Yummo!


    Ingredients:

    • 1 1/2 cups cold or broccoli slaw (recipe calls for broccoli, which I couldn't find)
    • 1/4 cup skinny blue cheese dressing  (recipe below)
    • 1.25 lbs 93% lean ground turkey
    • 2/3 cup grated carrots (grate in food processor) 
    • 1/4 cup seasoned whole wheat breadcrumbs (couldn't find whole wheat, used regular)
    • 1 clove garlic, grated 
    • 1 tbsp red onion, grated
    • 1/4 cup Franks Hot Sauce ( A MUST!  I poured more on our burgers as we ate them)
    • salt and fresh pepper
    • oil spray
    • 5 slices reduced fat cheddar
    • 5 whole wheat burger buns (I used Martin's 100 calorie Potato Whole Wheat Buns)
    • Grilled Potato slices as side (recipe below)

    Directions:

    In a medium bowl combine slaw and skinny blue cheese dressing. Set aside.

    In a large bowl, combine ground turkey, carrots, breadcrumbs, garlic, onion, hot sauce, salt and pepper. Makes 5 equal patties, 5.5 oz each.


    Heat a large skillet on high heat. When hot, lightly spray the oil. Add burgers to the pan and reduce the heat to medium-low.


    Cook on one side until browned 4-5 minutes, then flip. Cook another 4 minutes or until burgers are cooked all the way through (keep heat medium-low to prevent burning);top with cheese and place on a toasted burger buns topped with broccoli slaw.

    If grilling, clean grill well before cooking and spray with oil spray to prevent sticking.


    Low Fat Creamy Blue Cheese Dressing


    Ingredients:
    • 1/2 cup crumbled blue cheese
    • 6 oz fat free Greek yogurt
    • 1 tbsp light mayonnaise
    • 1 tbsp lemon juice
    • 1 tbsp white wine vinegar
    • 1/8 teaspoon garlic powder
    • salt and freshly ground black pepper

    Directions:

    In a small bowl, mash blue cheese and yogurt together with a fork. Stir in mayonnaise, lemon juice, vinegar, and garlic powder until well blended. Season to taste with salt and pepper. Makes 1 cup.


    Grilled Potatoes:


    Ingredients:

    • 2 (13 oz total) medium russet potatoes, washed
    • 2 tsp olive oil
    • sea salt and fresh cracked pepper
    • (If you have a crinkle cutter - I didn't - it makes them look more authentic. If you want one, they are on amazon, but you don't need one)

    Directions:

    Preheat grill to medium-high heat (indoor grill would work too).

    Cut potatoes into 1/4-inch thick slices. Toss the potatoes with olive oil. Add salt, and pepper to your taste.

    Reduce heat on the grill to medium and lay the potatoes slices straight onto the grill; close the lid. Cook until the potatoes are golden on one side, about 6 to 10 minutes, making sure they don't burn and adjusting flame accordingly. Turn and cook until tender inside when pierced with a fork, but slightly crisp and golden brown on the outside. Remove from grill, and serve immediately.


    Happy Eating Friends! ~Trina

    Sunday, July 22, 2012

    The Anti-Chicken Fingers Movements ~ Light Cajun Chicken Pasta

    Whenever you hear the word light, you automatically wonder if the dish can be good as it's fatty counterpart.  But, I guarantee you, this dish does.  It was delicious, and had a ton of veggies packed in so also...nutritious!  Try it with shrimp, or both chicken & shrimp to change it up if desired.


    Ingredients:
    • 8 ounces uncooked linguine (I used whole wheat)
    • 1 pound chicken breast strips
    • 1-2 tsp Cajun seasoning (I used Tony's Seasoning instead)
    • 1 tbsp olive oil
    • 1 medium red bell pepper, thinly sliced
    • 1 medium yellow bell pepper, thinly sliced
    • 8 oz fresh mushrooms, sliced
    • 1/2 red onion, sliced
    • 3 cloves garlic, minced
    • 2 medium tomatoes, diced
    • 1 cup fat free low sodium chicken broth
    • 1/3 cup skim milk
    • 1 tbsp flour
    • 3 tbsp light cream cheese
    • fresh cracked pepper
    • 2 scallions, chopped
    • salt to taste
    • Smart Balance cooking spray

    Directions:

    Prep all your vegetables. In a small blender make a slurry by combining milk, flour and cream cheese. Set aside. Season chicken generously with Cajun seasoning, garlic powder and salt.

    Prepare pasta in salted water according to package directions.

    Heat a large heavy nonstick skillet over medium-high heat; spray with cooking spray and add half of the chicken. Sauté 5 to 6 minutes or until done, set aside on a plate and repeat with the remaining chicken. Set aside.


    Add olive oil to the skillet and reduce to medium; add bell peppers, onions, and garlic to skillet, sauté 3-4 minutes


    Add mushrooms and tomatoes and sauté 3-4 more minutes or until vegetables are tender. Season with 1/4 tsp salt, garlic powder and fresh cracked pepper to taste.


    Reduce heat to medium-low; add chicken broth and pour in slurry stirring about 2 minutes.


    Return chicken to skillet; adjust salt and Cajun seasoning to taste, cook another minute or two until hot, then add linguine; toss well to coat. Top with chopped scallions and enjoy!
    Happy Eating Friends! ~ Trina

    Sunday, July 15, 2012

    The Anti-Chicken Fingers Movement ~ Chicken Marsala with Pancetta and Cream

    I love chicken marsala.  And this is by far one of the best recipes I've ever made.  I would suggest cooking with whole wheat pasta if desired, and doubling the ingredients for the sauce so you have enough to mix with the pasta.


    INGREDIENTS

    • Olive oil
    • 2 oz pancetta (about a 1/4 inch thick slice), cut into 1/4 inch cubes
    • 1/2 medium onion, diced (or you can use chopped shallots)
    • Flour for dredging (about 1/2 cup)
    • 1 lb of skinless, boneless chicken breasts, cut or pounded into thin cutlets
    • Salt
    • Freshly ground black pepper
    • 3/4 cup dry Marsala wine
    • 6 Tbsp 1/2 & 1/2 or heavy cream
    • Whole wheat pasta if desired, I used linguine and then doubled the sauce mixture - cream, marsala, salt/pepper, onion


    Directions:

    1 Coat a large skillet lightly with olive oil and set it over medium high heat. Add the pancetta and cook until just crip and lightly browned. Remove with a slotted spoon, leaving the fat in the pan, and set aside. Add the onions to the pan and cook until translucent and slightly browned, 5-10 minutes. Remove with a slotted spoon, leaving the fat in the pan, and set aside.
    2 Put the flour on a plate. Pat the cutlets dry. Season them on both sides lightly with salt and amply with pepper. Heat the skillet with the pancetta fat over medium high. Add more olive oil, if needed, to get about 2 Tbsp of fat in the pan.
    3 When the fat is hot, dredge a cutlet through the flour on both sides. Shake off the excess flour and immediately put the cutlet in the pan. Do the same with as many cutlets as will fit in the pan without touching. Sauté the cutlets, turning once, until browned on both sides. If thin, they should cook through in just a few minutes total. Transfer the cooked cutlets to a plate and continue sauteíng the rest, adding more oil if necessary. Transfer these to the plate as well.
    4 Pour off the excess fat. With the pan over med-high heat, add the Marsala and scrape up any browned bits from the bottom of the pan. Cook until the Marsala is reduced by about a quarter. Stir in the cream and boil until you get a nicely thickened sauce. 
    Return the chicken, onions, and pancetta to the pan and turn the cutlets over to coat. Let them reheat for 30 seconds to 1 minute.

    Serve w/salad and bread also if desired.

    Happy Eating Friends! ~ Trina

    Monday, July 9, 2012

    The Anti-Chicken Fingers Movement ~ Whole Wheat Chocolate Chip Cookies

    Whole Wheat Chocolate Chip CookiesI know we generally stick to actual meals for our Anti-Chicken Fingers Movement, but I think it's nice to throw an appetizer or a dessert in there once in awhile to spice things up!  These are the absolute best chocolate chip cookies I've ever had or made, stolen directly from Betty Crocker herself. I tell myself they are slightly healthier because they are made with whole wheat flour.  If you are going for lower cal, you can even substitute the butter for margarine.  Either way, they are delicious!


    3/4
    cup granulated sugar
    3/4
    cup packed brown sugar
    1
    cup butter or margarine, softened
    1
    teaspoon vanilla
    1
    egg
    2
    cups Gold Medal® whole wheat flour
    1
    teaspoon baking soda
    1/2
    teaspoon salt
    1/2
    package dark chocolate chocolate chips (2 cups)


    1. Heat oven to 375ºF.
    2. Mix sugars, butter, vanilla and egg in large bowl. Stir in flour, baking soda and salt (dough will be stiff). Stir in chocolate chips. Drop dough by rounded tablespoonfuls about 2 inches apart onto ungreased cookie sheet.
    3. Bake 8 to 10 minutes or until light brown (centers will be soft). Cool slightly; remove from cookie sheet. Cool on wire rack.
    Makes 3 dozen cookies

    Happy Eating Friends! ~ Trina

    Sunday, July 1, 2012

    The Anti-Chicken Fingers Movement ~ Eggplant Lasagna

    This sounded completely disgusting to me, but it was actually totally delish! I added cooked chicken because I knew my husband would complain if there wasn't any meat...however this is a great meal for vegetarians as well!

      Ingredients:

    • 2 Beaten Eggs
    • 1/4 Cup Milk
    • Garlic & Onion Powder
    • Salt & Pepper
    • 1 Lg Eggplant peeled & sliced into 1/2 inch thick slices
    • 1/2 cup dry bread crumbs
    • 4 Tbl or more of Olive Oil
    • 1 Jar Spaghetti Sauce
    • 2 Cups Shredded Mozzarella
    • 2.5 Cups Swiss Cheese
    • 1/4 Cup Shredded Parm Cheese
    • 1/4 Cup Romano Cheese
    • Cooked Chicken pieces/chunks if desired 
    • Fresh Basil if desired
    Directions:

    Heat oven to 350 degrees.  In med bowl, mix together eggs, milk, garlic powder, onion powder, salt and pepper (seasonings to taste). In a sep medium bowl, put breadcrumbs.  Heat olive oil in skillet.  Dip eggplant in egg mixture on both sides, then in bread crumbs.  Fry slices in olive oil until browned on both sides.  Drain oil on paper towel.  Cover bottom of 13 x 9 inch pan lightly with pasta sauce.  use 1/2 of eggplant slices, then layer cheeses, the repeat (if you are using cooked chicken, layer as well).  Bake 30-45 minutes until cooked through. Sprinkle with Fresh Basil if desired.  Happy Eating Friends! ~ Trina

    Friday, June 29, 2012

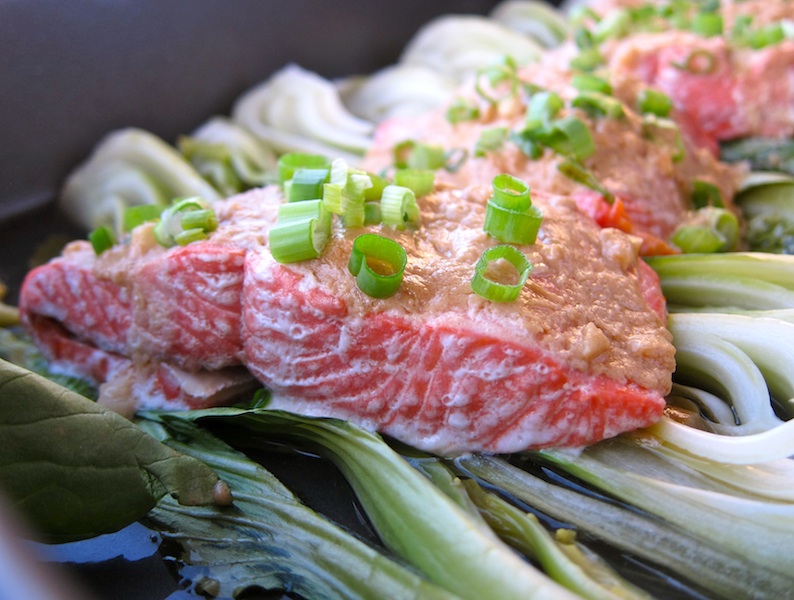
    The Anti-Chicken Fingers Movement - Ginger-Scallion Salmon

    Scallion-Ginger Baked Salmon with Baby Bok ChoyYes, I'm on an Asian-style cooking kick!

    Ginger-Scallion Salmon Ingredients
    Cucumber Salad:
    2 tablespoons sesame oil
    2 tablespoons chopped fresh dill
    1/2 cup rice wine vinegar
    1/4 cup mirin (Japanese rice wine)
    1 teaspoon white sesame seeds
    1 teaspoon black sesame seeds
    2 cucumbers, halved, seeded, and cut into very thin slices

    Ginger Crust:
    1/3 cup minced fresh ginger root
    4 green onions, thinly sliced
    4 cloves garlic, minced
    1/4 cup peanut oil

    Salmon:
    2 tablespoons peanut oil
    4 (8 ounce) center-cut salmon fillets
    Kosher salt and freshly ground black pepper, to taste
    2 tablespoons honey

    Ponzu Butter:
    2 tablespoons unsalted butter
    2 shallots, minced
    1/2 cup dry white wine
    3 tablespoons ponzu sauce
    1/2 cup heavy cream
    1/2 cup cold unsalted butter, cut into 1/2-inch pieces
    Kosher salt to taste

    Directions

    To make the cucumber salad, stir together sesame oil, dill, rice vinegar, mirin, and sesame seeds in a glass or plastic bowl; add cucumber, and toss until well coated. Cover, and refrigerate for 2 hours. Let sit at room temperature for 30 minutes before serving.
    To prepare the ginger crust, stir together the ginger, green onions, and garlic in a sturdy, metal bowl; set aside. Heat 1/4 cup peanut oil in a small saucepan over high heat until it begins to smoke. Remove from heat, and carefully stir in the ginger mixture; set aside.
    Preheat oven to 425 degrees F (220 degrees C).
    Heat 2 tablespoons peanut oil in a large, ovenproof, nonstick skillet over medium-high heat. Season salmon fillets to taste with salt and pepper. Sear salmon until golden brown on both sides, 30 to 40 seconds per side. Transfer to a plate, and wipe excess oil from skillet. Spread honey over top of fillets, then evenly spread with reserved ginger crust.
    Replace salmon into the skillet, and place into the oven. Bake until the center of the salmon turns opaque, 6 to 7 minutes.
    Meanwhile, melt 2 tablespoons butter in a small saucepan over medium heat, stir in shallots, and cook until softened and translucent, about 2 minutes. Pour in white wine, then simmer until nearly evaporated. Add the ponzu sauce and heavy cream, reduce by 1/2. Remove from heat, then whisk in cold butter pieces until dissolved; season to taste with kosher salt.
    To assemble the dish, season the cucumber salad to taste with salt. Divide the salad evenly onto four plates, spreading it out into a 4 to 5-inch circle. Drizzle the ponzu butter onto the bare area of the plate, around the cucumber salad. Place a salmon fillet, crust-side up, on top of the salad, and serve.

    Buon Appetito! Leah

    Sunday, June 24, 2012

    The Anti-Chicken Fingers Movement ~ Queso Chicken


    Hello comfort food!  This will make you feel like you are eating cheesy chicken, yet knowing it's not full of fat.  It was spicy enough that the hubby enjoyed, but not too much where it was too hot for the kids. 

    Ingredients:
    • 6 boneless chicken breasts 
    • 3 teaspoons Taco Seasoning
    • 8 ounces cheddar cheese, shredded 
    • 1/4 cup light cream or 2% milk
    • 1/4 cup light sour cream
    • 1/4 cup light may (optional, makes a bit creamier)
    • Squash & Zucchini, sliced & either steamed or cooked in a frying pan with olive oil  and 1 tbl butter (side dish)

    10 ounce can Ro-tel tomatoes, drained (tomatoes with green chilies)
    Season the chicken breasts with the taco seasoning. Grill and keep warm while preparing the queso sauce.
    In a medium microwaveable bowl, mix the sour cream, cheese and milk or cream. Heat on stove over medium-high heat to melt the cheese; stir until well blended and creamy. Whisk in the mayonnaise until smooth then stir in the Ro-tel tomatoes. Microwave about 2 minutes on 50% power until heated through. Serve the sauce over the chicken. Garnish with sliced green onions, if desired, and serve the squash & zucchini as a side. 


    Happy Eating Friends! ~ Trina

    Sunday, June 10, 2012

    The Anti-Chicken Fingers Movement ~ Skinny Meatloaf Cupcakes with Mashed Potato Frosting


    What kid doesn't want dinner in the shape of a cupcake?  And...the husband loves meat and potatoes (even turkey burger!) so it was a win-win!  Plus...there's a secret veggie snuck in to the meat...nobody even knew! Enjoy!


    Ingredients:

    For the Meatloaf Cupcakes:

    • 1.3 lb 93% lean ground turkey
    • 1 cup grated zucchini, all moisture squeezed dry with paper towel
    • 2 tbsp onion, minced
    • 1/2 cup seasoned breadcrumbs
    • 1/4 cup ketchup
    • 1 egg
    • 1 tsp kosher salt

    For the Skinny Mashed Potato "Frosting":

    • 1 lb (about 2 medium) Yukon gold potatoes, peeled and cubed
    • 2 large garlic cloves, peeled and halved
    • 2 tbsp fat free sour cream
    • 2 tbsp fat free chicken broth
    • 1 tbsp skim milk
    • 1/2 tbsp light butter
    • kosher salt to taste
    • dash of fresh ground pepper
    • 2 tbsp fresh thyme

    Corn & Salad or desired side dish

    Directions:

    Put the potatoes and garlic in a large pot with salt and enough water to cover; bring to a boil. Cover and reduce heat; simmer for 20 minutes or until potatoes are tender.Drain and return potatoes and garlic to pan. Add sour cream and remaining ingredients. Using a masher or blender, mash until smooth. Season with salt and pepper to taste.

    Meanwhile, preheat the oven to 350°. Line a muffin tin with foil liners.
    In a large bowl, mix the turkey, zucchini, onion, breadcrumbs, ketchup, egg, and salt.Place meatloaf mixture into muffin tins filling them to the top, making sure they are flat at the top.

    Bake uncovered for 18-20 minutes or until cooked through. Remove from tins and place onto a baking dish.
    Pipe the "frosting" onto the meatloaf cupcakes and serve with corn and salad.


    Happy Eating Friends! ~Trina